
Your counters feel crowded, your drawers scream for mercy, and that one pan lid keeps playing hide-and-seek. Let’s fix it. Wall-mounted storage turns blank space into a working system that saves time, sanity, and yes, a little bit of soul.
You don’t need a renovation—just a few smart pieces, a drill, and the will to stop stacking things “temporarily.” Ready?
Why Go Vertical? The Case for Wall Storage

Vertical space solves the two big kitchen problems: limited counters and chaotic drawers. When you mount essentials on the wall, you see everything.
You grab, use, and put back without digging. Key perks you’ll notice fast:
- Speed: Tools sit where you cook. No sprinting across the room for the whisk.
- Clarity: You know what you own. Duplicates stop multiplying like gremlins.
- Clean counters: Prep space stays open, because clutter lives off the surface.
- Style points: Wall setups double as decor.Function can look good, IMO.
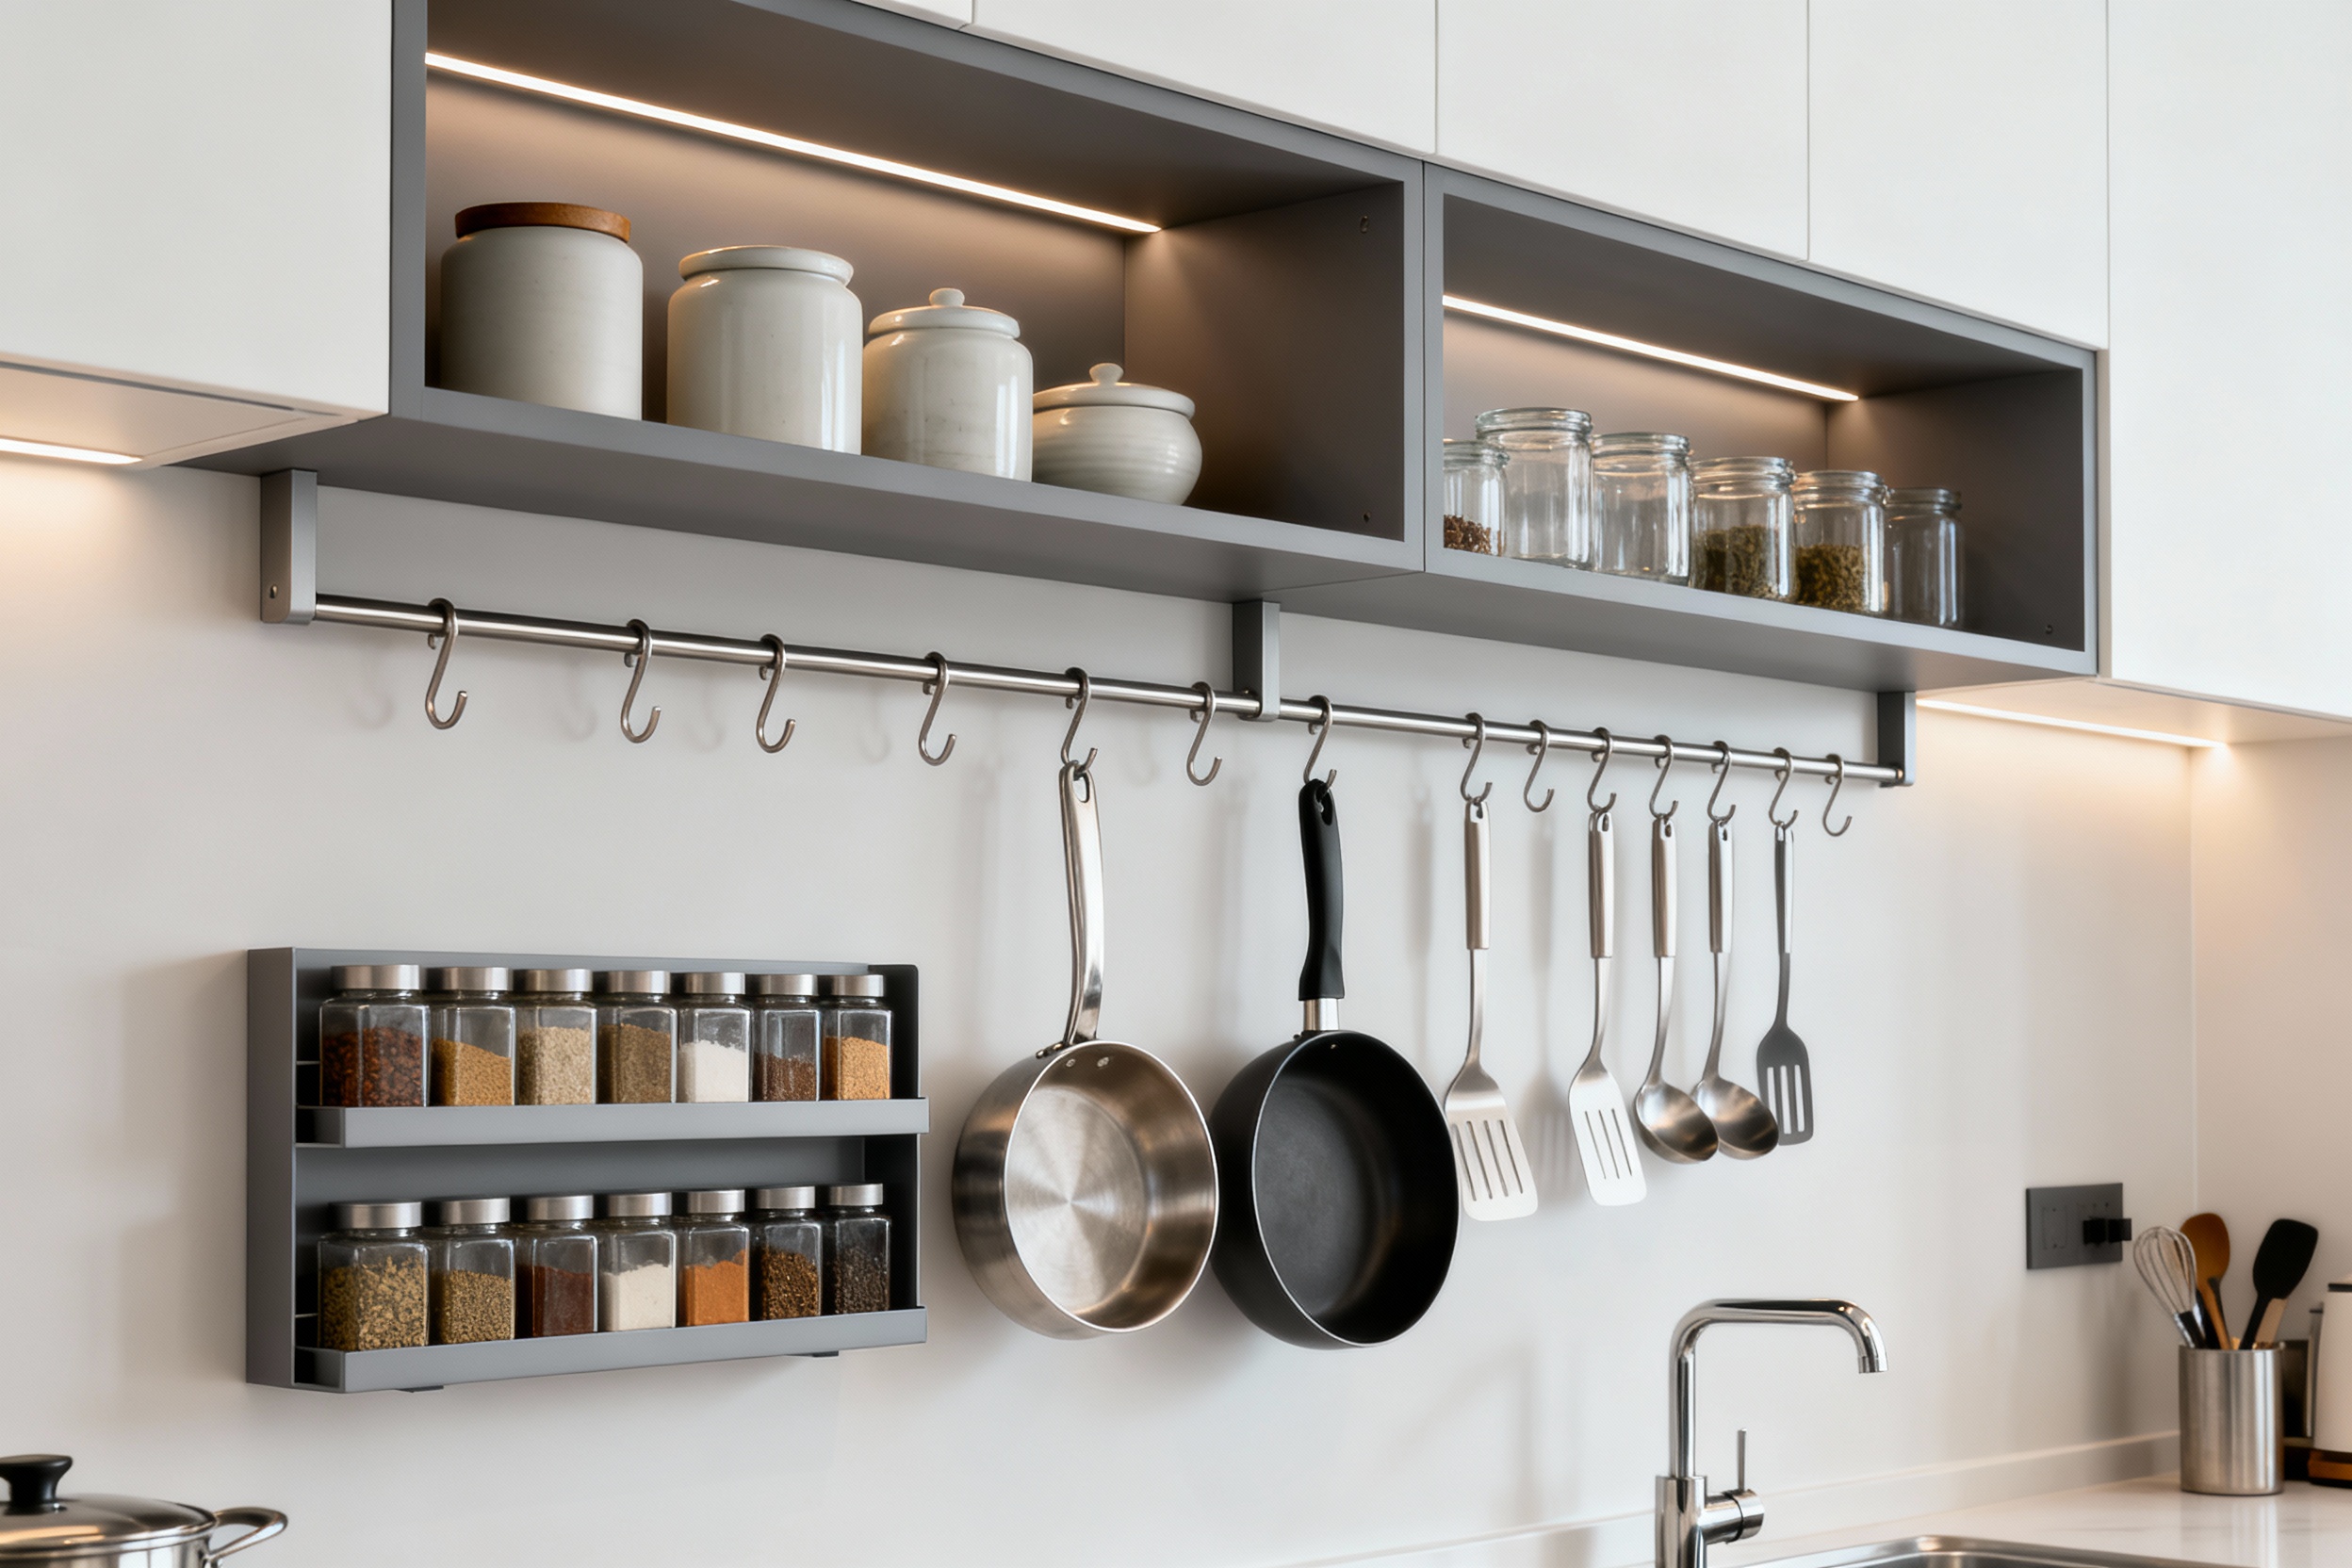
Rail Systems: The MVP of Kitchen Walls
Rail systems are the backbone—literally a metal bar with hooks and baskets. Mount one above your backsplash or next to the stove and you’ve got instant access. What to hang on rails:
- Everyday utensils: ladles, tongs, spatulas
- Small pots and pans
- Measuring cups/spoons
- Herb planters (because you’re fancy)
- Mini baskets for garlic, onions, or spice jars
How to pick the right rail
- Material: Stainless steel resists grease and looks sleek. Matte black hides fingerprints.
- Depth clearance: Leave 2-3 inches from backsplash so handles don’t hit tile.
- Load rating: Check weight capacity.Pots weigh more than your optimism.
Quick placement tips
- Mount 16–20 inches above the counter for comfortable reach.
- Keep hooks ~3–4 inches apart to avoid clanking chaos.
- Place near your main prep zone, not across the room, FYI.
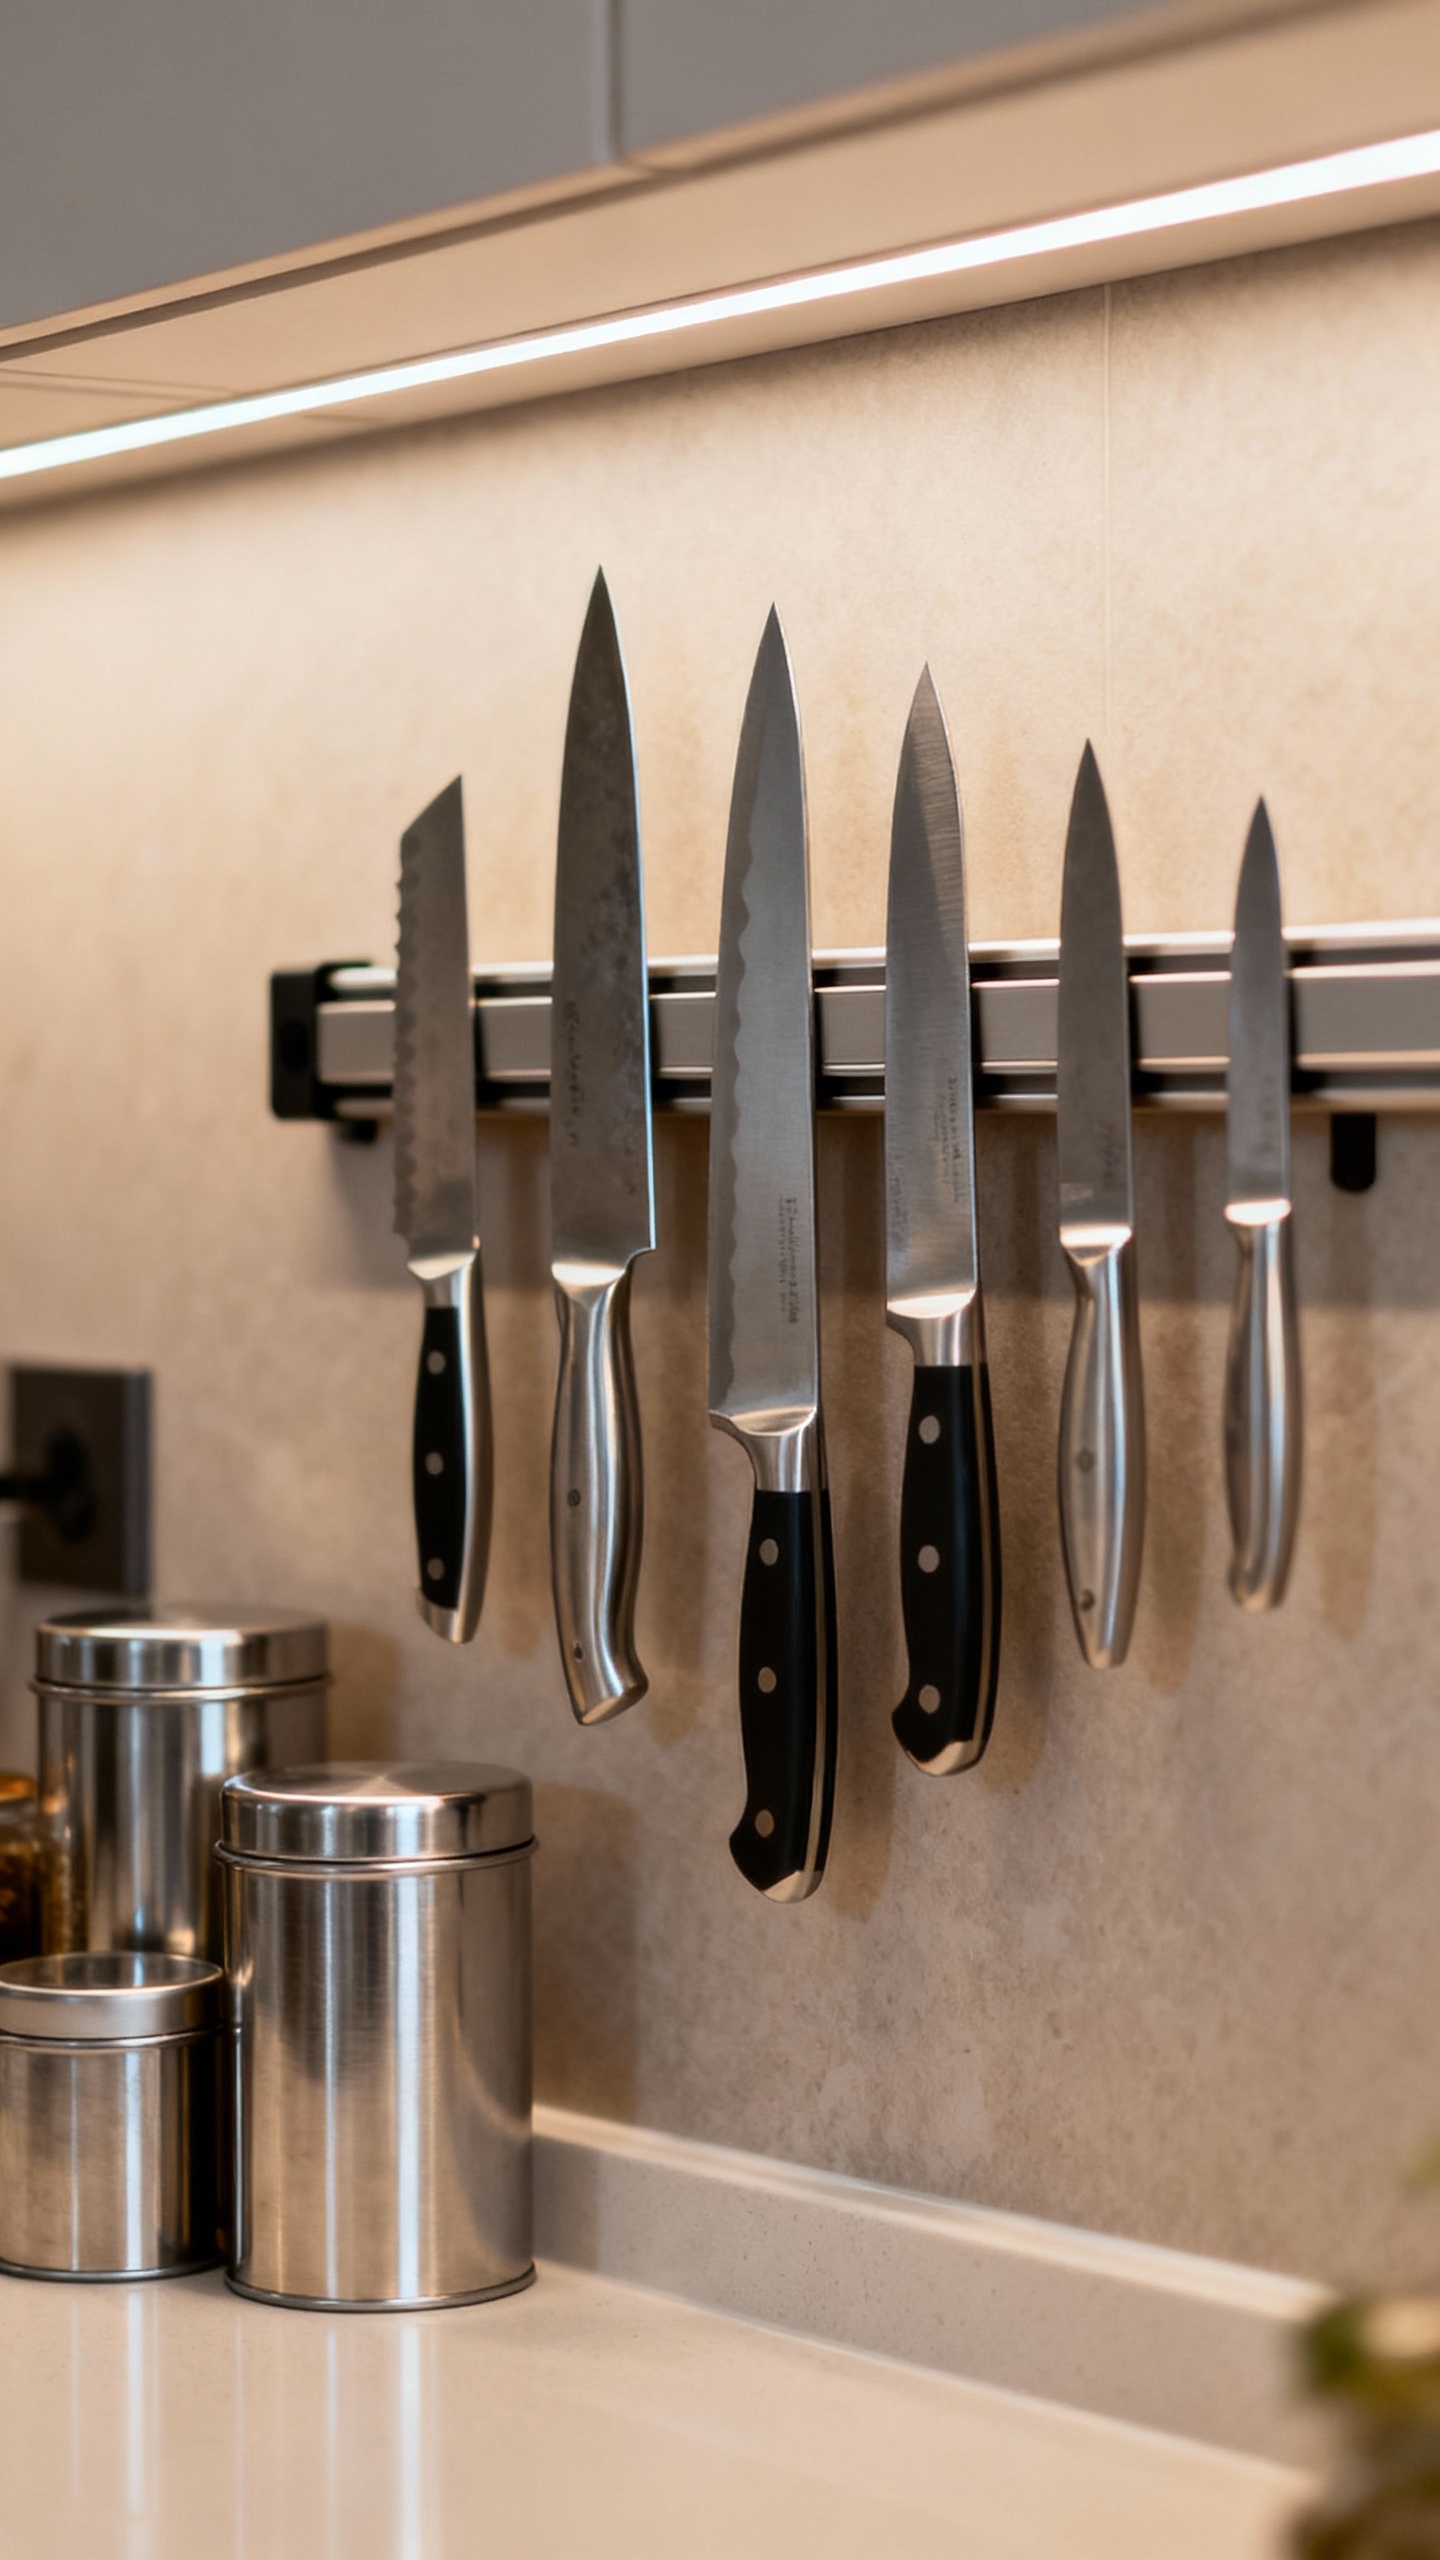
Magnetic Magic: Strips for Knives and More
Knife blocks hog space and trap crumbs. Magnetic strips solve both. You’ll see your blades, keep them dry, and feel like a pro every time you grab one. What works on magnet strips besides knives:
- Metal spice tins
- Steel measuring spoons
- Small tongs
- Bottle openers
Safety and mounting
- Install into studs or use heavy-duty anchors.Knives falling = hard pass.
- Mount slightly above eye level to keep sharp edges out of kid range.
- Choose a strip with strong neodymium magnets. Weak magnets make sad noises and dent floors.
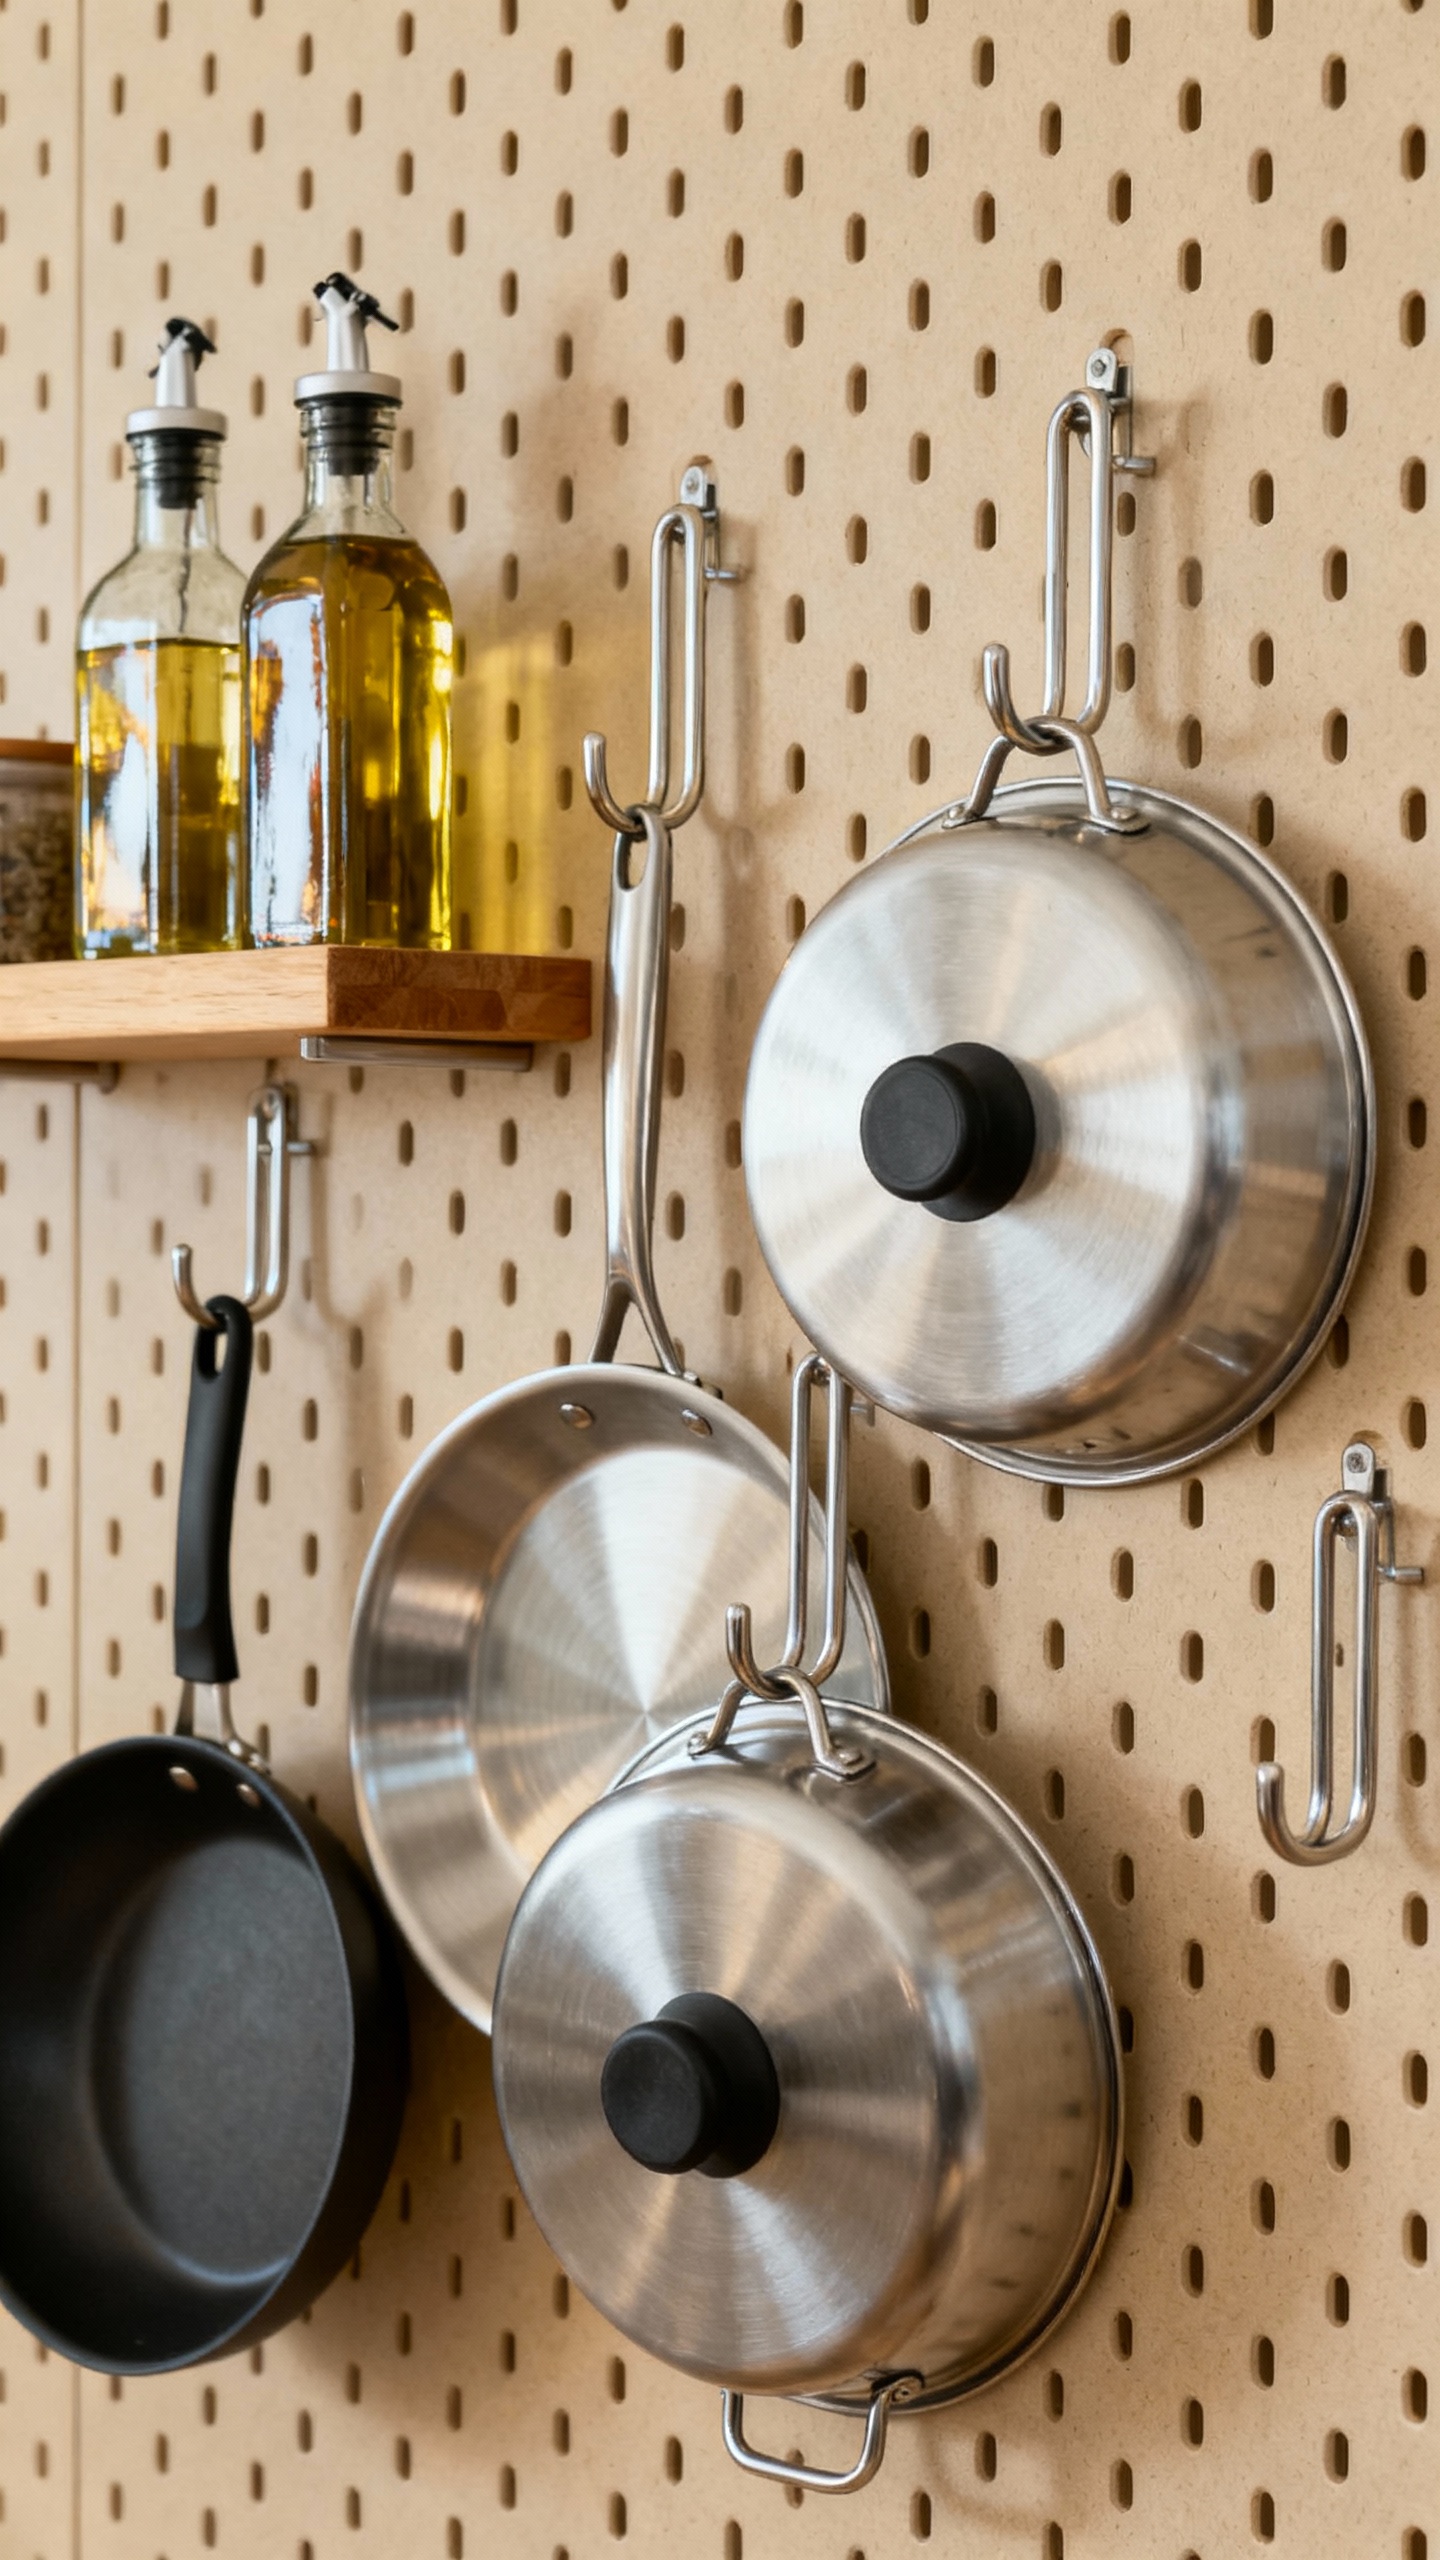
Pegboards: The Customizable Workhorse
Pegboards aren’t just for garages. In a kitchen, they handle odd-shaped tools, pots, lids, and even baking sheets.
You can rearrange hooks and shelves whenever your setup changes. Best places for pegboards:
- Empty wall near the entry to your kitchen
- Breakfast nook that wants a job
- Inside a pantry door (yes, a thin one works)
Build a useful layout
- Group by task: baking on one zone, stovetop tools on another.
- Use shelf ledges for oils and vinegars. Add a rail below for towels.
- Hang lids on U-shaped hooks—no more Jenga towers in drawers.
Floating Shelves: Display Without the Dust Trap
Floating shelves give you open storage without bulky upper cabinets. Keep them curated.
If everything goes up there, nothing looks good and you’ll never find the cumin. What belongs on floating shelves:
- Daily dishes and bowls
- Frequently used mixing bowls
- Clear canisters (flour, sugar, oats)
- Cookbooks you actually use, not just the pretty ones
Shelf strategy
- Install into studs. These will hold heavy stuff; no wobbly drama.
- Use uniform containers to reduce visual noise. Your brain will thank you.
- Leave some breathing room.Negative space makes it look intentional, IMO.
Spice Storage That Actually Works

Spices love chaos. You reach for paprika and grab cinnamon, and now your chicken tastes festive. Wall-mount a spice rack and label everything. Options that keep you sane:
- Tiered wall racks: Simple, visible, no shuffling.
- Magnetic tins: Stick to a strip or steel board.Great for tiny kitchens.
- Under-shelf strips: Mount beneath floating shelves for hidden-but-handy access.
Labeling and rotation
- Use clear, uniform jars with top labels for fast ID.
- Date them. Ground spices fade after 6–12 months.
- Group by cuisine or heat level so you stop hunting mid-sauté.
Small Kitchens: Maximize Every Inch
Tight space? Wall storage helps you cheat.
Use corners, backsplashes, and even the sides of cabinets. Smart micro-upgrades:
- Side-mount racks: Screw a narrow rack to the cabinet side for oils and vinegar.
- Towel bar as lid holder: Mount horizontally; slide pan lids behind it. Works like a charm.
- Stacked rails: Two short rails beat one long one in awkward spaces.
- Fold-down shelf: Hinged mini-shelf for laptops or recipes. Fold away after.
Renter-friendly options
- 3M or Command hooks for light tools and oven mitts.
- Over-cabinet door racks for cutting boards and wraps.
- Freestanding pegboard panels that lean but don’t drill.
Materials, Mounting, and Maintenance
Good hardware matters.
You don’t need the most expensive, but you do need sturdy. Pick materials that match your reality:
- Stainless steel: Heat- and grease-resistant. Easy to clean.
- Powder-coated steel: Durable, color options, budget-friendly.
- Solid wood shelves: Warm look; seal them to resist splashes.
Mounting basics:
- Find studs with a reliable finder. If none, use proper anchors and respect load limits.
- Measure twice, drill once.Then check level. Then check again.
- Keep at least 2 inches from stove edges to avoid heat damage.
Keep it clean:
- Wipe rails and strips weekly; kitchen grease travels—annoying but true.
- Rotate items seasonally. If you haven’t used it in a year, it doesn’t deserve wall space.
- Re-tighten screws every few months.Walls shift, life happens.
Curate, Don’t Clutter: Design Tips That Help
Your wall storage should feel intentional, not like a utensil explosion. Edit as you go. Make it look pulled together:
- Stick to a color palette: black hardware + glass jars + wood accents works almost anywhere.
- Mix closed and open storage. A few bins or lidded baskets hide the “meh” stuff.
- Vary heights for interest, but align the bottoms of shelves/rails for visual calm.
- Leave some white space.Not every inch needs a gadget, FYI.
FAQ
Will wall-mounted storage make my kitchen look cluttered?
Not if you edit. Keep only daily-use items out, use uniform containers, and maintain space between zones. Treat the wall like a gallery—curated, not crammed.
Can I mount storage without drilling?
Yes, to a point.
Heavy items require screws, but light tools, spices, and towels can use adhesive hooks or magnetic systems on a steel panel. Test weight limits and clean surfaces first.
How high should I mount a knife strip?
Aim slightly above eye level for adults in your home, and away from stove splatter. You’ll keep blades safe from curious hands and grease.
Always use strong anchors or hit studs.
What’s the best setup for renters?
Try leaning pegboards, over-cabinet racks, adhesive rails, and magnetic panels on the fridge side. Choose products designed for removal so you don’t lose your deposit—landlords can sense holes like hawks.
How do I keep spices near heat without ruining them?
Mount spice racks a foot or more from the stove and away from direct sunlight. Use opaque or UV-protective containers if you love the window spot.
Heat and light kill flavor fast, IMO.
What’s the easiest upgrade with the biggest impact?
Install one sturdy rail with hooks near your main prep zone. Hang your go-to tools and a small basket for measuring spoons. You’ll feel the difference the next time you cook pasta at 9 p.m. after a long day.
Conclusion
Walls aren’t just for art—they’re for making dinner less annoying.
Start with a rail or a magnetic strip, then add shelves or a pegboard as you figure out your flow. Keep only what you use, mount it solid, and let form meet function. Your countertops will finally breathe, and you might even enjoy cooking again.
Wild idea, right?